Screenshot, sometimes referred to as a screengrab, is an image that captures everything displayed on your computer or smartphone screen. At times, you may want to take a screenshot on your Windows 11 computer, and there could be various reasons behind it.
Taking screenshots on Windows 11 isn’t just handy; it could be a time-saver, especially when you need to demonstrate something that would otherwise be difficult to explain in words.
A few months ago, we shared a guide on Techviral where we discussed a few best ways to take a screenshot on Windows 11. You can rely on the built-in Print Screen functionality or use third-party apps for capturing a screenshot.
If you rely on the Windows + Print Screen shortcut to take a screenshot, you might know that Windows 11 saves the screen captures in the ‘Screenshots’ folder inside the ‘Pictures’ folder. On Windows 11, it’s pretty easy to assign a new folder location for saving screenshots in case you want to change the default one.
Steps to Change the Screenshot Folder Location in Windows 11
Hence, in this article, we will share a step-by-step guide on how to change the Screenshot folder location in Windows 11. The steps will be very easy; just follow them as we have mentioned. So, let’s get started.
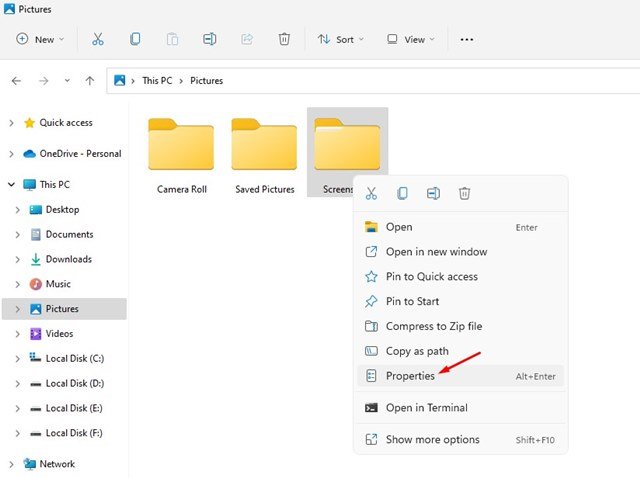
1. First of all, open the File explorer of your PC and navigate to the ‘C:\Users\<username>\Pictures folder’.
2. You will find multiple folders inside the Pictures folder. You need to right-click on the Screenshots folder and select the Properties.
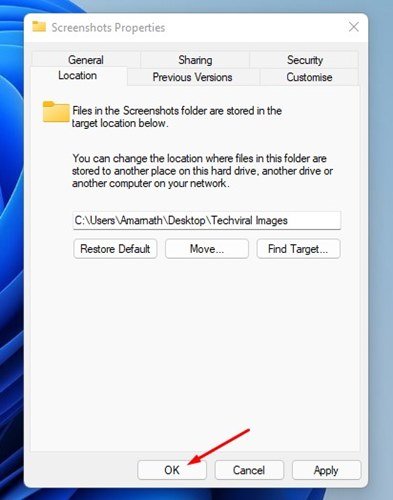
3. On the Screenshots Properties, switch to the Location tab as shown in the screenshot below.
4. Next, click on the Move button as shown below in the screenshot.
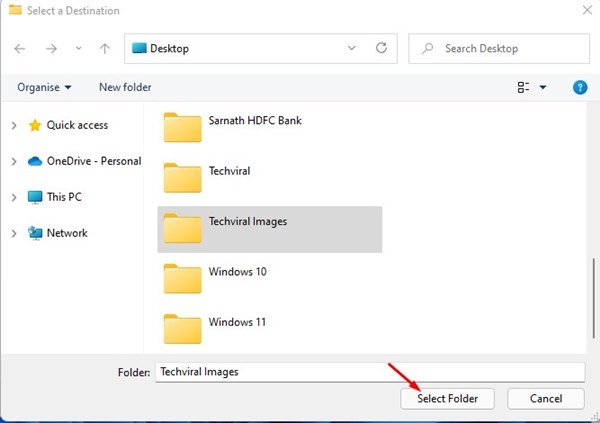
5. Now, on the file picker interface, select the new folder where you want to store your screenshots. Once done, click on the Select Folder button.
6. This will change the default screenshot folder location on your Windows 11. You just need to click on the Ok button to apply the changes.
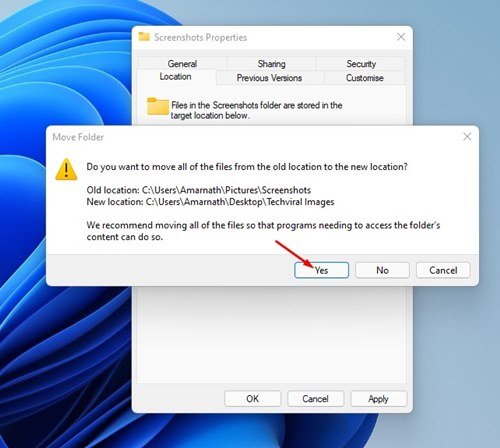
7. Now, you will see a prompt asking you to move all the screenshots to the new folder. To move all screenshots to a new folder, click on the Yes button.
That’s it! You are done. This is how you can change the default screenshot folder location on Windows 11.
It’s pretty easy to change the screenshot folder location in Windows 11. I hope this article helped you! Please share it with your friends also. If you have any doubts related to this, let us know in the comment box below.
The post How to Change the Screenshot Folder Location in Windows 11 appeared first on TechViral.


