If you are not using Stock Android, it will have many bloatware for sure. Bloatware generally doesn’t cause any problems with the working of Android, but over time it can make your phone slow down.
Fortunately, you can easily remove these bloatware if you have a rooted device. However, what if you don’t have a rooted device, neither you want to root it? In such a case, it’s best to disable the pre-installed apps on Android.
The disabled apps won’t run in the background; neither will they use your mobile data or affect the performance. So, it’s always best to disable pre-installed apps that you rarely use on your device.
So, in this article, we will share a step-by-step guide on how to disable pre-installed apps on Android smartphones without root. Let’s check out.
Disable Any Pre-Installed System Apps On Android
You first need to get ADB up and running on your Windows, Mac, or Linux PC to use this method. For that, you can follow our guide –
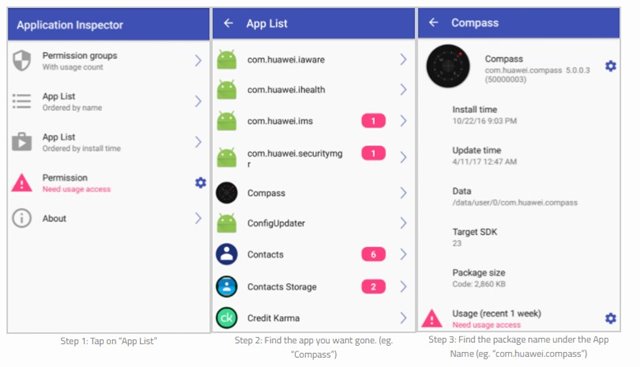
In addition to this, we will also need an app known as the App Inspector, which is available for free in the Google Play Store.
Once you download and install the app on your Android device, open the app. Now here, you can see the name of the ‘package’ of any of the applications installed on your smartphone. Now, what we have to do with it is to identify what is the ‘internal name’ of the pre-installed app that we want to uninstall or disable, and from here only, we can continue.
We will have to open our computer or PC with the mobile connected via USB cable.
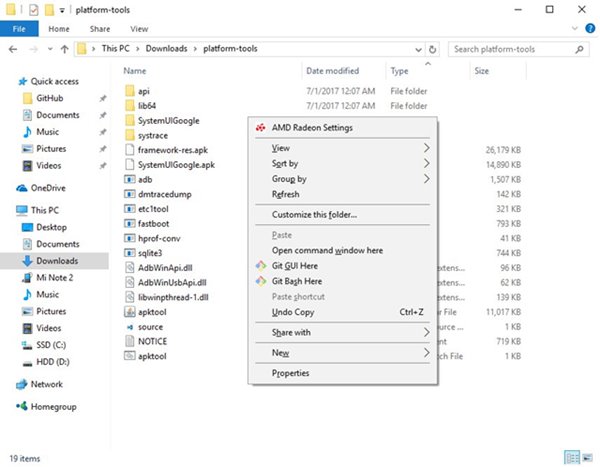
Once done, you need to launch the CMD/PowerShell in the directory where you stored the ADB Binary. If you are using Windows, you need to open the folder where you stored ADB Binary, hold the shift key, and right-click on a blank space. Then, select ‘Open Command Window here’ on the Right-click menu.
Once this is done, now we will have to enter the following commands:-
- Windows Command Prompt: adb shell pm disable-user –user 0 <package_to_disable>
- Windows PowerShell: .\adb shell pm disable-user –user 0 <package_to_disable>
- Mac/Linux Terminal: ./adb shell pm disable-user –user 0 <package_to_disable>
Important: Where it says <package_to_disable>, we have to enter the package name of the application we want to remove from our device..
How to Enable the Disabled Applications?
However, in case if we would like to recover the applications that we have disabled, then we would have to execute the following commands that we have mentioned below:-
- Windows Command Prompt: adb shell pm list packages -d
- Windows PowerShell: .\adb shell pm list packages -d
- Mac/Linux Terminal: ./adb shell pm list packages -d
- Now you will get the list of applications that have been disabled, and knowing the package name of the same, we can choose the one we want back.
Hence, to enable it, the last command that we would have to execute is the following, substituting <package_to_enable>, again, for the corresponding package name.
- Windows Command Prompt: adb shell pm enable <package_to_enable>
- Windows PowerShell: .\adb shell pm enable <package_to_enable>
- Mac/Linux Terminal: ./adb shell pm enable <package_to_enable>
- That’s it now you are done.
Like this, anyone can disable or enable pre-installed applications or bloatware from their Android devices without any root permission. So, what do you think about this? Share all your views and thoughts in the comment section below.
The post How To Disable Any Pre-Installed System Apps On Android appeared first on TechViral.


