On Windows operating systems you get an app store which is called Microsoft Store or Windows Store. Microsoft Store is available even on the latest version of Windows – Windows 11, and it’s your one-stop destination to everything you will require on your computer.
If you use Windows 11 and rely on the Microsoft Store to download apps & games, you might have noticed that some apps weren’t available in your country. You can’t even find the app that was not available in your region on the Microsoft Store.
If an app or game is unavailable in the Microsoft Store, it means that the game or app is only available in selected countries, and users outside of those countries can’t get it.
Yes, you can get those apps from third-party sites, but if you want to keep your security & privacy intact, you should look for ways to download them from the Microsoft Store. The apps & games you download from the Microsoft Store are mostly secure as it goes through multiple security checks.
So, in order to download apps & games that are not available for your region, you need to change the Microsoft Store region on Windows. You can easily change the Microsoft Store region in just a few minutes, and that’s too without using any proxy or VPN server.
Steps to Change Microsoft Store Country & Region in Windows 11
Hence, if you are interested in changing the Microsoft Store Region on your Windows 11 computer, you are reading the right guide. Below, we have shared a step-by-step guide on how to change the Microsoft Store region on Windows in easy steps. Let’s get started.
Change Microsoft Store Region via Settings
We will use Windows 11’s Settings app to change the Microsoft Store region in this method. You just need to follow some of the simple steps as we have mentioned below. Let’s check out.
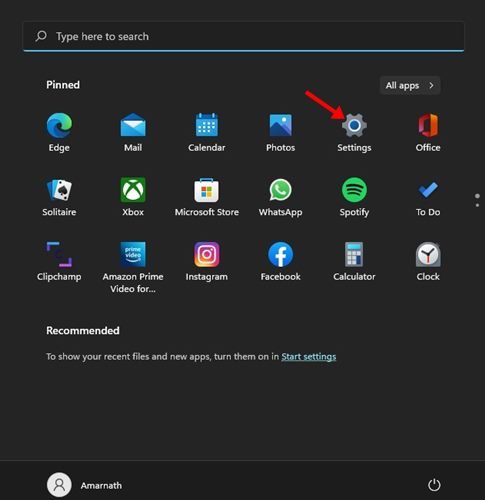
1. First of all, click on the Windows 11 Start button and select Settings.
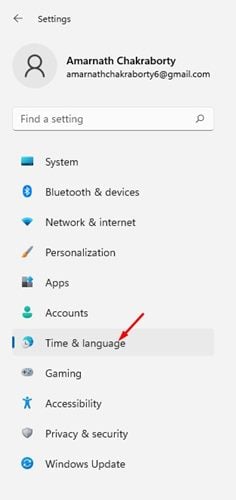
2. On the Settings page, click on the Time & language option as shown below.
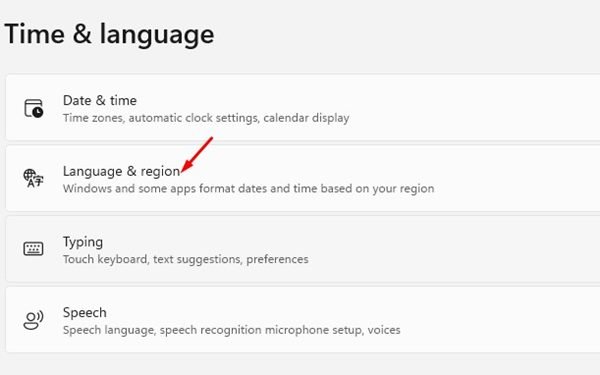
3. On the right pane, click on the Language & region on the Time & Language page.
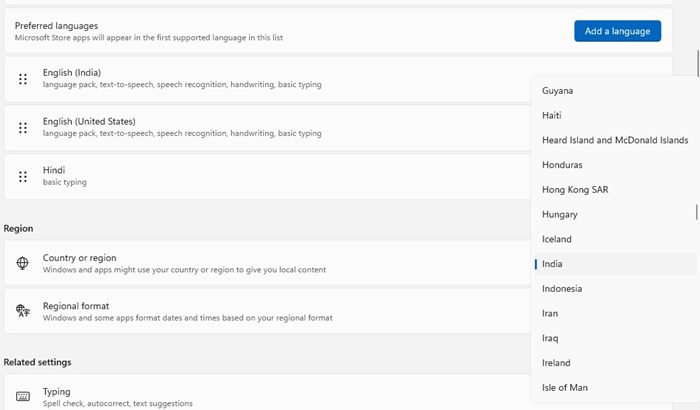
4. On the next screen, scroll down to the Region Section.
5. On the Country or Region, you need to click on the drop-down and select your desired location.
6. After making the changes, you need to restart your Windows 11 PC. After the restart, you can download the app from the Microsoft Store.
That’s it! This is how you can change the Microsoft Store region on Windows 11 in easy steps.
Although it’s pretty easy to change your Microsoft Store region on Windows 11, we don’t recommend changing the country or region settings unless you move to a new country or region. I hope this article helped you! Please share it with your friends also. If you have any doubts related to this, let us know in the comment box below.
The post How to Change Microsoft Store Country & Region in Windows 11 appeared first on TechViral.


