The apps you download from the web or the Microsoft Store are designed to take advantage of your hardware and software information. If you revoke the permissions to access the device information, the apps won’t work.
Similarly, some apps can see specific information about the other apps running on your device. For example, the Task Manager app on your Windows 11 can show you information about every other running app on your system.
Usually, Microsoft’s Windows operating system carefully isolates the apps so they don’t interfere with each other. However, malicious apps can sometimes make their way to your device and use the App Diagnostic data to grab information about other running apps.
Also read: How to Allow or Deny Write Access to Removable Drives in Windows 11
Disable App Diagnostics in Windows 11
Hence, it’s always best to check which apps have access to your App Diagnostic data in Windows 11. You need to check this detail periodically to avoid giving away your data to the threat actors. Below, we have shared a step-by-step guide on how to disable app diagnostics on Windows 11. Let’s check out.
What type of Data is available in the App diagnostic
Before enabling or disabling the app diagnostic, it’s best to know what kind of information is available in the app diagnostic. The information available in app diagnostics are as follows:
- The name of the apps running in the background
- The package name of each running app
- Name of the user account where the app is running
- Memory usage of the app and other process-level information.
These are the pieces of information made available in the app diagnostic data.
How to Disable App Diagnostic on Windows 11
To turn off the App diagnostic on your Windows 11 computer, you must follow some of the simple steps we have shared below. Here’s how to disable app diagnostic on Windows 11.
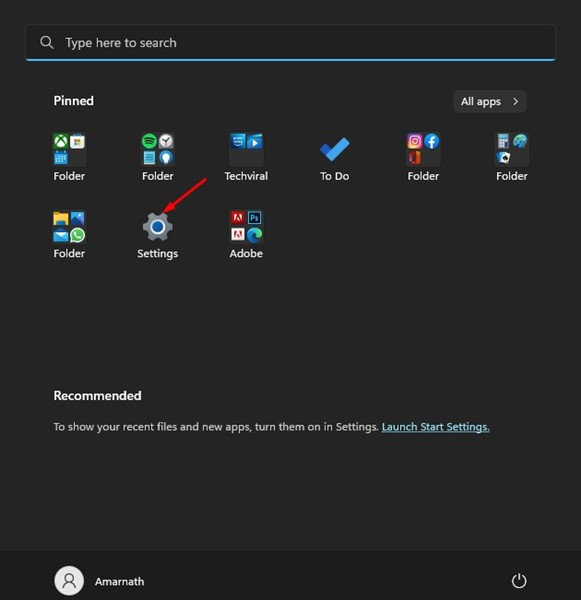
1. First, click on the Windows 11 Start button and select Settings.
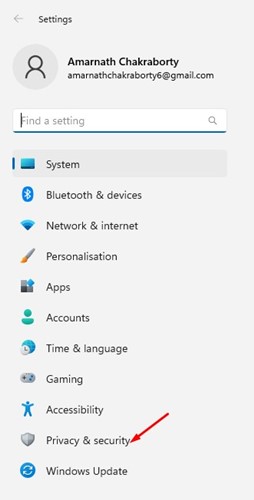
2. On the Settings app, click on the Privacy & security option on the left pane.
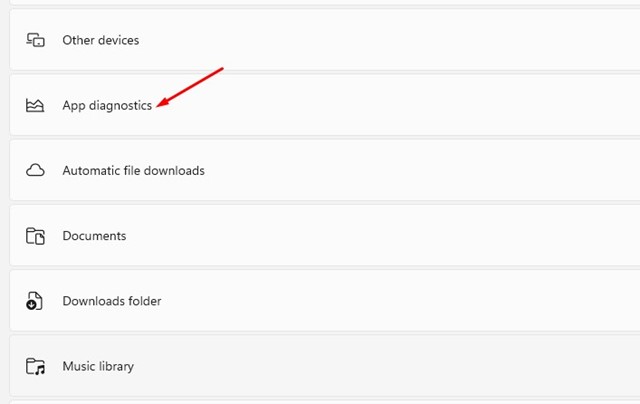
3. On the Right side, scroll down and click on the App diagnostics.
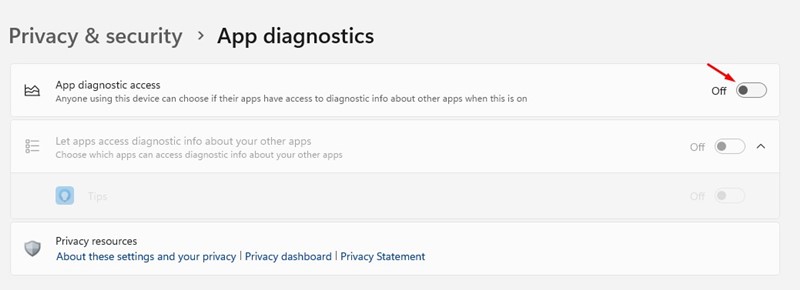
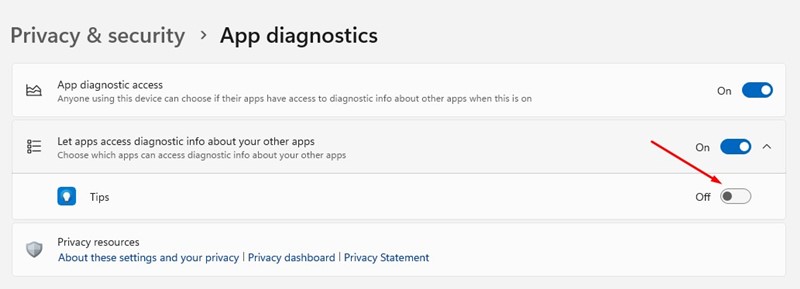
4. Disable the toggle for App diagnostic access on the App diagnostics page.
That’s it! This is how you can disable app diagnostic access manually. No apps can access the App diagnostics information if it’s turned off.
Turn off App Diagnostic for Specific Apps on Windows 11
If you want, you can turn off app diagnostic for specific apps on Windows 11. Here’s what you need to do.
1. First, click on the Windows 11 Start button and select Settings.
2. On the Settings app, click on the Privacy & security tab on the left.
3. On the right, scroll down to the end and click on App Diagnostics.
4. Now enable the toggle for App diagnostic access.
5. Next, expand the Let apps access diagnostic info about your other apps section. Now turn off the toggle switch next to the application name you don’t want to access the App diagnostics.
That’s it! This is how you can turn off app diagnostic for specific apps on Windows 11.
Also read: How to Improve Apps’ Performance With Windows 11’s Game Mode
So, that’s all about how to turn off app diagnostic for apps on Windows 11. You should turn off this option if you often download apps from third-party sources. If you need more help with the App diagnostic, let us know in the comments below.
The post How to Disable App Diagnostics in Windows 11 appeared first on TechViral.

